

Step1
Right click on each of the following three images and save them on your computer: “body.gif”, “left.gif” and “right.gif”. You need them to complete this tutorial.


Step2
Create a new document in Flash MX (400X300 pixels). In Timeline Tab insert 3 layers. Now we have 4 layers. Rename these layers like this:

Step3
Import the pictures that you saved in the first step, as follows: in the layer “body” import the “body.gif”, in the layer “left” - “left.gif” and in the layer “right” import “right.gif”. Look the results:

Step4
Adjust the pictures positions like below:

Step5
On the layer “bgr” using Brush Tool (B) draw the contour of the butterfly’s body. The result should be like this:

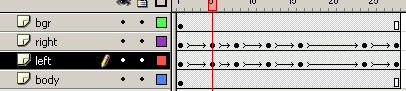
Step6
Now the wings animation. Choose layer “left”. On the frame 28 insert a new frame then right click and Create Tween Motion. On the frame 5 right click and Insert Keyframe. New keyframes on the frames 8, 12, 16, 24, 28.
Repeat the step with the layer “right”. You should get something like this:
Step7
On the keyframe “left” in position 5, select the “left.gif” in stage, resize it and move it to the next coordinates: X=188.4, Y=36.5.
On the keyframe “right” in position 5, resize and move to: X=198.4, Y=43.5.

Step8
Repeat step7 for keyframe 12: resize and move “left.gif” X=164.9, Y=36.5, “right.gif” X=197.9, Y=43.5:
Step9
For keyframe 24 resize and move “left.gif” X=142.4, Y=36.5 and “right.gif” X=197.9, Y=43.5.

Step10
On the layer “body” in position 28 right click and Insert Frame. Repeat this for layer “bgr”.
Step11
CTRL+ENTER and watch your movie.
Filed under Flash Tutorials